So I just thought I'd share a few of my tips and tricks.
~ My favorite brands include: Essie, OPI, and butter LONDON. I also like using Sally Hansen and Revlon.
~ My routine for the perfect manicure always begins with trimming my cuticles. I just like getting those suckers out of the way and it's pretty easy to do. Here is my favorite tool.
~ I always shape my nails with a file rather than clipping them to ensure I'm getting nice straight edges. I've found the most flattering shape for nails is not completely rounded (grandma alert) and not completely squared (makes your fingers look chubby), just a nice in between of the two.
~ Next I buff after I'm done shaping. Buffing after prevents nails from breaking/chipping because you're sealing together all those little nail layers. Plus it makes your nails so soft and smooth.
~ I never put on a base coat. Manicurists may gawk at that, but when using any of my favorite brands, the nail polish is high enough quality that it won't stain nails and I've found that I get fewer chips and my manicure lasts longer without the base coat. (Okay I lied - if I'm ever using a cheap brand I always use a base coat to keep the polish from staining my nails.)
~ Instead of shaking the bottle of polish prior to painting, roll it between your palms. Shaking it can put air bubbles in your polish, which end up looking dumb on your nails.
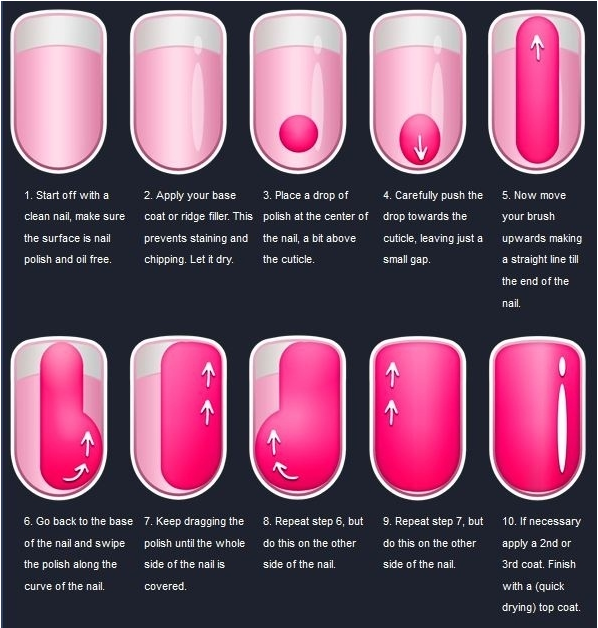
~ When applying nail polish start with a stroke down the middle, then do the sides. This ensures that you cover your entire nail and you have straight lines. It also reduces the amount of polish that ends up on your skin. I found a nifty diagram to show this step-by-step {below}.
 |
| via |
~ For my top coat I like to apply a nail growth or nail strengthening polish because I have naturally thinner nails. If you apply a thin top coat every other day, you're manicure will last longer with fewer chips.
~ After my nails have dried for a few minutes, I run them under cold water to set them. This dries them so fast. You can also just soak them in ice water immediately after you paint them - I'm just lazy so putting them under the faucet is easier than getting ice out of the freezer, putting it in a bowl, yaddah yaddah yaddah. That's so bad. Resolution: stop being lazy and soak nails next time they're painted.
~ To take off any polish that's showed up on my skin I dip a q-tip in polish remover and fix that real quick.
~ Also biotin is a great little vitamin for nails (and hair). I've added it to my daily vitamins and I can totally see a difference.
This was kind of a long post with lots of words and only one picture. Boring! But I hope it's helps :)

This comment has been removed by the author.
ReplyDelete'Grandma alert'? Hilarious. I can't stand polish on my fingernails, just on my toenails. But I love the little tutorial with pictures that you posted. You learn something new every day. Thanks! Excited to see you in your wedding dress!
ReplyDelete